Nikon D200 Instruction Manual: A Comprehensive Guide
Welcome! This manual details the Nikon D200, a camera beloved by enthusiasts and professionals alike․ Explore Nikon Club’s resources,
spanning from 1986’s autofocus zooms to modern digital photography, and troubleshoot common issues like flash failures․
The Nikon D200 represents a significant milestone in Nikon’s digital SLR history, offering a compelling blend of professional features and accessible design․ Released after the pioneering F501 and its 70-210mm autofocus zoom in 1986, the D200 built upon decades of Nikon’s optical and mechanical expertise․ This camera quickly became a favorite among enthusiasts and semi-professional photographers seeking high image quality and robust performance․
This instruction manual serves as a comprehensive guide to unlocking the full potential of your Nikon D200․ Whether you’re a newcomer to digital photography or an experienced user, you’ll find detailed explanations of the camera’s functions, controls, and settings․ Resources like Nikon Club Ufficiale provide a vibrant community for support and shared knowledge, reflecting a long-standing dedication to Nikon products and photographic culture․ We’ll cover everything from basic operation to advanced techniques, ensuring you can confidently capture stunning images․
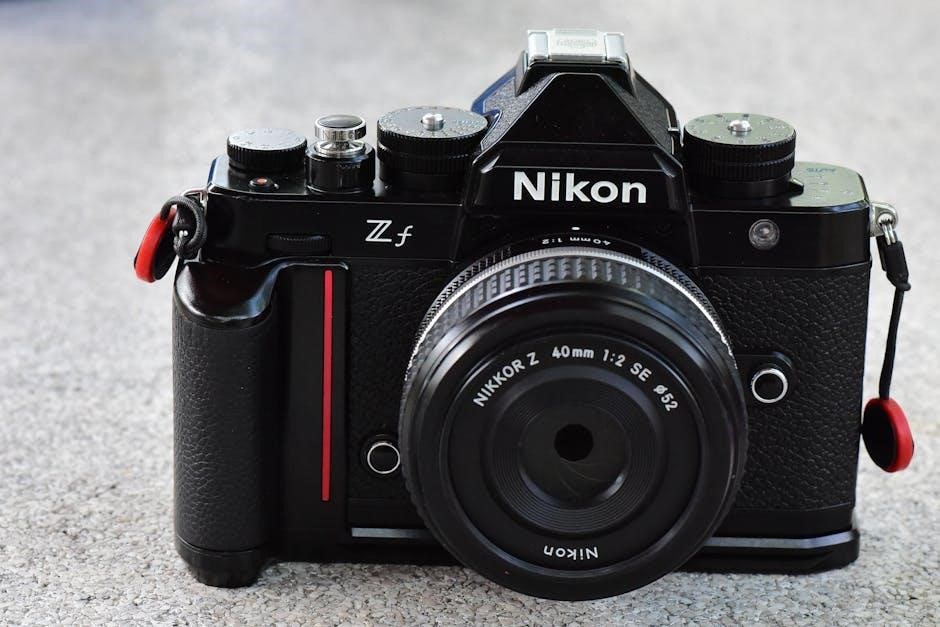
Understanding the Camera Body and Controls
The Nikon D200’s body is designed for comfortable and intuitive operation, echoing Nikon’s legacy dating back to models like the F501․ Familiarize yourself with the placement of key controls – the mode dial, shutter button, and command dials – for seamless adjustments during shooting․ The rear panel houses the LCD screen for image review and menu navigation, alongside buttons for accessing essential settings like autofocus and metering․
Understanding the function of each button and dial is crucial for efficient workflow․ Explore the top panel, noting the pop-up flash and accessory shoe․ Nikon Club Ufficiale, a community dedicated to Nikon enthusiasts, offers valuable insights and discussions regarding optimal control configurations․ Mastering these physical controls, combined with the menu system, will empower you to fully harness the D200’s capabilities and achieve your creative vision, avoiding common frustrations like flash issues․
Key Features of the Nikon D200
The Nikon D200 boasts a robust feature set, building upon Nikon’s long history of innovation, starting with early autofocus telezooms like the Nikkor 70-210mm f/4 introduced in 1986․ Its 10․2-megapixel DX-format CCD sensor delivers exceptional image quality, while the advanced 11-point autofocus system ensures sharp focus across a wide frame area․ The camera supports continuous shooting at up to 5 frames per second, capturing fast-action sequences with ease․
Further enhancing its versatility is the D200’s extensive range of creative controls, including customizable Picture Control settings and comprehensive white balance options․ Nikon Club Ufficiale provides a platform for users to share experiences and tips․ Its durable construction and weather sealing make it suitable for various shooting conditions, and its compatibility with a vast array of Nikkor lenses expands creative possibilities, even addressing potential flash malfunctions․

Setting Up Your Nikon D200
Begin your journey! Properly insert the battery and a compatible memory card to power on your D200, joining Nikon’s community of photographers․
Inserting the Battery and Memory Card
Powering Your Camera: The Nikon D200 utilizes an EN-EL3a or EN-EL3e rechargeable lithium-ion battery․ Locate the battery compartment on the bottom of the camera body․ Ensure the camera is turned off before proceeding․ Gently slide the battery compartment latch to the open position․ Insert the battery, aligning the contacts correctly, and push it in until it clicks securely․
Memory Card Installation: The D200 supports CompactFlash (CF) memory cards․ The memory card slot is also located on the bottom of the camera, adjacent to the battery compartment․ Open the card compartment door․ Insert the CF card, label side up, and push it in until it locks into place․ Do not force the card․ Close both the battery and memory card compartment doors, ensuring they are securely latched․ A properly inserted battery and memory card are essential for capturing and storing your photographs․ Remember to consult Nikon Club resources for further assistance․
Initial Camera Settings and Configuration
First-Time Setup: Upon powering on your Nikon D200 for the first time, a language selection screen will appear․ Use the multi-selector to choose your preferred language and press the OK button․ Next, set the date, time, and area․ Accurate date and time settings are crucial for proper image file organization and metadata․
Customizing for Your Needs: Navigate to the setup menu to configure initial settings․ Consider setting the image quality to RAW+JPEG for maximum editing flexibility․ Choose your desired image size based on your intended use – larger sizes offer more detail but require more storage space․ Explore the menu options to personalize button assignments and display settings․ Remember, resources like Nikon Club can provide valuable insights into optimizing your camera’s configuration for specific shooting scenarios․
Setting the Date, Time, and Language
Initial Setup Steps: When you first power on your Nikon D200, the camera will prompt you to set the language․ Utilize the multi-selector buttons to scroll through the available options and confirm your choice with the OK button․ Following language selection, the date and time settings screen will appear․ Accurate date and time are vital for correct file naming and chronological organization of your photographs․
Precise Configuration: Input the correct date (MM/DD/YYYY) and time (HH:MM:SS)․ Ensure the time is set accurately to avoid issues with image sequencing and potential conflicts when sharing photos․ Refer to online Nikon communities, like Nikon Club, for assistance if needed․ Incorrect settings can be easily adjusted later through the camera’s setup menu, ensuring your D200 is always properly configured․

Shooting Modes Explained
Explore Creativity: The Nikon D200 offers diverse shooting modes, from fully automatic simplicity to complete manual control, empowering photographers of every skill level․
Auto Mode for Beginners
Effortless Photography: The Auto mode on your Nikon D200 is designed for simplicity, making it perfect for beginners or situations demanding quick results․ In this mode, the camera automatically selects the optimal settings – aperture, shutter speed, ISO, and white balance – based on the scene it detects․ This eliminates the need to understand complex photographic principles initially, allowing you to focus on composition and capturing the moment․
How it Works: The D200’s internal metering system analyzes the light and subject matter, then chooses settings to achieve a well-exposed image․ While convenient, remember that Auto mode doesn’t always make the creative choices you might prefer․ It prioritizes a technically correct exposure over artistic intent․ For example, it might not intentionally blur the background or freeze motion in the way you envision․
Limitations: Be aware that Auto mode can sometimes struggle in challenging lighting conditions or with unusual subjects․ It’s a great starting point, but as you gain confidence, exploring other shooting modes will unlock the full potential of your Nikon D200․
Program Auto (P) Mode
A Step Beyond Auto: Program Auto (P) mode on the Nikon D200 offers a balance between convenience and control․ Like Auto mode, it automatically selects both aperture and shutter speed for optimal exposure․ However, P mode allows you to override certain settings while still maintaining automatic operation for others․ This is ideal for situations where you want some creative input without fully committing to manual control․
Flexibility and Control: In P mode, you can adjust ISO, white balance, exposure compensation, and flash settings․ You can also shift the program – effectively altering the combination of aperture and shutter speed the camera chooses – to favor either a wider aperture (for shallow depth of field) or a faster shutter speed (for freezing motion)․
Expanding Your Skills: P mode serves as a valuable stepping stone towards mastering aperture-priority and shutter-priority modes, allowing you to gradually gain a deeper understanding of exposure principles and photographic techniques․
Aperture-Priority (A) Mode
Controlling Depth of Field: Aperture-Priority (A) mode on the Nikon D200 empowers you to dictate the depth of field in your images․ You select the desired aperture (f-stop), and the camera automatically determines the appropriate shutter speed for correct exposure․ A wider aperture (lower f-number, like f/2․8) creates a shallow depth of field, blurring the background and isolating your subject – perfect for portraits․
Creative Control: Conversely, a narrower aperture (higher f-number, like f/16) yields a greater depth of field, keeping more of the scene in focus – ideal for landscapes․ While you control the aperture, the camera still manages ISO, white balance, and exposure compensation․
Understanding Exposure: Mastering A mode is crucial for understanding the relationship between aperture, shutter speed, and exposure, building a solid foundation for more advanced photographic techniques and creative expression․
Shutter-Priority (S) Mode
Freezing or Blurring Motion: Shutter-Priority (S) mode on your Nikon D200 grants you control over the shutter speed, allowing you to freeze action or create intentional motion blur․ You set the desired shutter speed, and the camera automatically adjusts the aperture to achieve proper exposure․ A fast shutter speed (e․g․, 1/1000s) freezes fast-moving subjects, like sports or wildlife․
Creative Effects: A slower shutter speed (e;g․, 1/30s) allows more light in, blurring motion – perfect for capturing the movement of water or light trails․ The camera manages aperture and ISO, but you retain control over exposure compensation․
Dynamic Photography: This mode is essential for dynamic photography, enabling you to capture the energy and movement of a scene, and is a stepping stone to full manual control;
Manual (M) Mode: Full Control
Ultimate Creative Freedom: Manual (M) mode on the Nikon D200 provides complete control over both shutter speed and aperture․ This mode is ideal for experienced photographers who want to precisely dictate the exposure settings for their images․ You independently adjust both settings, monitoring the light meter to achieve the desired exposure․
Mastering Exposure: Understanding the interplay between aperture (depth of field) and shutter speed (motion blur) is crucial in M mode․ It requires practice, but unlocks significant creative potential․ Like Shutter-Priority, exposure compensation is available for fine-tuning․
Consistent Results: Manual mode ensures consistent exposure across a series of shots, particularly useful in challenging lighting conditions․ It’s a powerful tool for artistic expression and technical precision․

Focusing and Metering
Precision is Key: Explore autofocus modes, area settings, and metering options—evaluative, center-weighted, and spot—to achieve sharp, properly exposed images consistently․
Autofocus Modes and Settings
Mastering Autofocus: The Nikon D200 offers a versatile autofocus (AF) system crucial for capturing sharp images․ Understanding the different AF modes is paramount․ Single Servo AF (AF-S) is ideal for stationary subjects, locking focus when the shutter button is half-pressed․ Continuous Servo AF (AF-C) tracks moving subjects, continuously adjusting focus as they change position․ Auto Servo AF (AF-A) automatically switches between AF-S and AF-C, attempting to determine the best mode for the situation․
AF Area Modes further refine focusing․ Single-area AF allows you to select a specific focus point․ Dynamic-area AF uses the selected focus point and surrounding points to track a moving subject․ Closest-subject priority AF automatically focuses on the nearest object within the frame․ Fine-tuning AF sensitivity is also possible, adjusting how quickly the camera responds to subject movement․ Remember to consult Nikon Club resources for advanced techniques and troubleshooting tips related to autofocus performance․
Focus Area Modes
Selecting Your Focus Point: The Nikon D200 provides several Focus Area Modes to tailor focusing to your specific shooting scenario․ Single-area AF lets you pinpoint a single focus point, perfect for static subjects and precise composition․ Dynamic-area AF utilizes the selected focus point and surrounding points, enabling tracking of moving subjects while maintaining focus even if they briefly move off the initial point․
Group-area AF employs a cluster of focus points, useful for subjects that are difficult to isolate with a single point․ Auto-area AF allows the camera to automatically select focus points, though this is generally less precise․ Finally, closest-subject priority AF focuses on the nearest object within the frame, ideal for macro or scenes with foreground elements․ Experimenting with these modes, and referencing Nikon Club discussions, will unlock optimal focusing performance for diverse photographic situations․
Metering Modes: Evaluative, Center-Weighted, Spot
Achieving Correct Exposure: The Nikon D200 offers three primary Metering Modes to analyze scene brightness and determine optimal exposure settings․ Evaluative metering (also known as matrix metering) assesses the entire frame, balancing brightness across all areas – a versatile choice for most situations․ Center-weighted metering prioritizes the center of the frame, diminishing influence from the edges, suitable for portraits or subjects centrally located․
Spot metering measures light from a very small area, allowing precise exposure control for challenging lighting conditions or specific subject elements․ Utilizing these modes, alongside Exposure Compensation, ensures accurate results․ Remember to consult resources like Nikon Club for insights into applying these modes effectively, especially when dealing with high-contrast scenes or unique lighting scenarios․
Exposure Compensation
Fine-Tuning Brightness: Exposure Compensation on the Nikon D200 allows you to override the camera’s automatically determined exposure, brightening or darkening images as needed․ Measured in stops (+/- EV), this feature is crucial when the camera’s metering system is fooled by unusually bright or dark scenes․ For example, shooting snow scenes often requires positive compensation (+EV) to prevent underexposure․
Conversely, dark subjects against a bright background may need negative compensation (-EV)․ Mastering this tool, alongside understanding the camera’s Metering Modes, is key to consistent results․ Explore resources like Nikon Club for practical examples and guidance on utilizing Exposure Compensation effectively in diverse photographic situations, ensuring your images accurately reflect your artistic vision․
Understanding the Menu System
Navigating Settings: The Nikon D200’s menu offers extensive customization․ Explore image quality, white balance, and flash settings, aided by Nikon Club’s community support․
Navigating the Nikon D200 Menu
Accessing the Menu: Press the “Menu” button on the back of the D200 to reveal the comprehensive menu system․ It’s logically organized into several tabs, each represented by a colored icon․ Use the multi-selector (directional pad) to highlight a tab and press the right button to enter․
Menu Tabs Explained: The menu includes options for Playback, Shooting, Custom Settings, Setup, and more․ Within each tab, you’ll find numerous settings controlling everything from image quality and autofocus to camera behavior and display preferences․ The Nikon D200’s menu, while extensive, is designed to be intuitive․
Using the Multi-Selector: Navigate through menu items using the up, down, left, and right buttons on the multi-selector․ Pressing the “OK” button selects the highlighted option or enters a submenu․ To return to the previous menu level, press the “Menu” button again․ Remember to consult Nikon Club resources for community insights and troubleshooting tips if you encounter any difficulties navigating the system․
Customizing Menu Settings
Personalizing Your D200: The Nikon D200’s power lies in its customizability․ Within the “Custom Settings” menu, you can tailor the camera to your shooting style․ Explore options like button assignments, autofocus behavior, and metering preferences․
Key Customizations: Consider customizing the “Quick Preview” function for instant image review after capture․ Adjust the autofocus-activation settings to match your shooting technique․ Fine-tune the metering mode to optimize exposure in various lighting conditions․ Remember, the Nikon Club offers valuable community knowledge․

Saving Custom Settings: The D200 allows you to save customized settings as presets, enabling quick recall for different shooting scenarios․ This is particularly useful for frequently changing settings․ Experiment with different combinations to discover what works best for you, and leverage online resources for inspiration and troubleshooting․
Image Quality and Size Settings
Optimizing Your Images: The Nikon D200 offers a range of image quality and size settings, crucial for balancing file size and detail․ Access these options within the “Shooting Menu․” Choose from RAW, JPEG, or both for maximum flexibility in post-processing․
RAW vs․ JPEG: RAW files retain all image data, offering superior editing capabilities, but require more storage space․ JPEGs are compressed, resulting in smaller files, ideal for immediate use․ Consider your workflow when selecting a format․ The Nikon Club provides insights from experienced photographers․
Resolution Choices: Select the appropriate image size (Large, Medium, Small) based on your intended output․ Higher resolutions are best for large prints or extensive cropping, while smaller sizes are suitable for web use․ Experiment to find the optimal balance for your needs․

Advanced Features
Unlock Potential: Explore white balance, picture controls, flash options, and wireless communication for creative control, benefiting from Nikon Club’s expertise․
White Balance Adjustment
Achieving Accurate Colors: White balance ensures colors appear natural, regardless of lighting conditions․ The Nikon D200 offers several white balance presets, including Daylight, Cloudy, Fluorescent, and Tungsten․ These presets provide a starting point for common lighting scenarios․
Custom White Balance: For precise color accuracy, utilize the custom white balance feature․ This involves photographing a white or gray card under the current lighting conditions․ The camera then analyzes this reference and adjusts the white balance accordingly․ This is particularly useful in challenging or mixed lighting environments․
Fine-Tuning: The D200 also allows for fine-tuning of white balance using the Kelvin temperature scale․ Adjusting the Kelvin value allows for subtle color shifts to achieve the desired look․ Experimentation is key to mastering white balance and capturing images with accurate and pleasing colors․ Remember to consult Nikon Club resources for advanced techniques and community insights․
Picture Control Settings
Tailoring Your Image Style: Nikon’s Picture Control system allows you to customize the look of your images directly within the camera․ The D200 offers Standard, Neutral, Vivid, and Monochrome presets, each affecting color, contrast, and sharpness․
Customizing Presets: Each preset can be further customized to your preferences․ Adjust sharpness, contrast, brightness, saturation, and hue individually to create a unique visual style․ Save your customized settings as new Picture Controls for easy recall․
Applying Picture Controls: Picture Controls are applied during shooting, providing a preview of the final image on the LCD screen․ This allows for immediate assessment and adjustment․ Explore the Nikon Club community for shared Picture Control settings and inspiration, enhancing your photographic vision and workflow․
Using Flash Effectively
Mastering Illumination: The Nikon D200’s built-in flash and compatibility with external flash units offer versatile lighting options․ Understand flash modes – TTL, Manual, and Red-Eye Reduction – to control light output and minimize unwanted effects․
Flash Compensation: Utilize flash compensation to fine-tune the flash intensity․ Positive values increase flash power, while negative values decrease it․ This is crucial for balancing flash with ambient light and achieving proper exposure․
Troubleshooting Flash Issues: If the flash isn’t firing, check battery levels, flash settings, and ensure the flash unit is securely attached․ Refer to online resources like Nikon Club for solutions to common flash problems, ensuring consistently well-lit photographs․
Remote Control and Wireless Communication
Expanding Your Capabilities: The Nikon D200 supports remote control operation via wired remote release (sold separately), enabling long exposures and minimizing camera shake․ Explore wireless capabilities through compatible wireless transmitters, allowing for off-camera flash control and remote shutter release․
Connecting with the Nikon Ecosystem: While the D200 predates modern wireless standards, utilizing compatible accessories unlocks remote functionality․ Engage with the Nikon community – like Nikon Club – for guidance on compatible equipment and optimal setup procedures․
Troubleshooting Connectivity: Ensure proper accessory connection and battery levels when using remote controls․ Consult the D200’s manual and online forums for solutions to connectivity issues, maximizing your creative control․
Troubleshooting Common Issues
Addressing Problems: Encountering issues? Common problems include flash failures and error messages; Nikon Club offers solutions and support for your D200․
Flash Not Firing
Troubleshooting a Non-Firing Flash: If your Nikon D200’s flash isn’t firing, several factors could be at play․ First, ensure the flash is properly attached and securely locked into the hot shoe․ Verify the flash unit itself has sufficient battery power – replace or recharge batteries as needed․
Next, check the camera’s flash settings․ Confirm that flash mode isn’t set to ‘Off’ or ‘Slow Sync’ in situations where immediate flash is required․ Explore the menu settings to ensure flash compensation isn’t set to a negative value, effectively reducing flash output to zero․ Also, confirm that the camera and flash are communicating correctly; sometimes, a simple reset of both devices can resolve connectivity issues․
If the problem persists, consider whether the camera is detecting an external flash unit․ The D200 might be attempting to use TTL (Through-The-Lens) metering, which requires compatible flash units․ Finally, resources like Nikon Club can provide further assistance and community-sourced solutions for this common issue․
Error Messages and Solutions
Decoding D200 Error Messages: The Nikon D200 utilizes error messages to indicate potential problems․ Common errors include “Battery Low,” requiring immediate battery replacement or charging․ “Card Full” necessitates either deleting images or inserting a new memory card․ More complex messages, like those related to the lens or autofocus system, often require a camera reset or a check of lens compatibility․
If an unfamiliar error appears, consult the D200’s comprehensive instruction manual for a detailed explanation and suggested solutions․ Online resources, such as Nikon Club, can also provide valuable insights and troubleshooting tips from experienced users․ Attempting to repair the camera yourself is strongly discouraged, as it may void the warranty;
Remember to note the exact error code displayed for accurate diagnosis․ A simple restart can often resolve temporary glitches, but persistent errors may indicate a hardware issue requiring professional attention․
Battery Life Problems
Maximizing D200 Battery Performance: Reduced battery life on your Nikon D200 can stem from several factors․ Frequent use of the LCD screen, live view mode, and flash significantly drain power․ Cold temperatures also negatively impact battery performance․ To extend battery life, minimize LCD usage, disable live view when not needed, and carry a spare, fully charged battery․
Ensure you’re using a genuine Nikon battery, as third-party options may not deliver optimal performance․ Regularly check the battery contacts for corrosion and clean them gently if necessary․ If the battery drains rapidly even with minimal use, it may be nearing the end of its lifespan and require replacement․ Consult Nikon Club resources for battery care tips․
Consider utilizing the camera’s power saving features, such as auto power-off, to conserve energy during inactivity․